Showing posts with label mini-maider. Show all posts

2013/06/04

Mini-Maider, the return...ha, ha,ha!


Hemen daude!! Ai ama MMM´13 arekin, Burda Challengearekin eta 11 proyectos para 2013arekin guztiz topera nabil eta nire Mini-maiderrak alde batera utziak nituen...marrazten jarraitu arren, ez dizuet ezertxo ere erakutsi. Hori dela eta zor dizuedana erakutsiko dizuet ;-) eta joste mahaian bueltaka daukadana ezagutuko duzue.

¡¡Y aqui están!! Con el MMM´13, el Burda Challenge y 11 proyectos para 2013 estoy bastante colapsada y tenía a las Mini-Maiders dejadas a un lado...pero aunque no os he enseñado nada yo he seguido dibujando. Como lo prometido es deuda ;-) os voy a enseñar que es lo que tengo dando vueltas en mi mesa de costura.

And here they are!! With MMM'13, the Burda Challenge and 11 projects for 2013 I'm pretty tired and I had to leave my Mini-Maiders aside ... although I didn´t show anything, I have drawn. As promised;-) I will show you what  I have on my sewing table.


Picture property of Masustak Eguzkitan

 
Hot cocoa sweater patroia berriro josi nahi dut (lehenengoa hemen), oraingoan berde lima batean eta zamaldeko handi batekin egingo dut. Bai badakit apur bat perfekzionista geratu leikela, baina ez nintzenez guztiz gustora geratu berriro josiko dut.

Voy a coser un nuevo Hot cocoa sweater (el primero aqui), esta vez será en un verde lima y con un gran cuello. Ya sé que esto queda perfecionista, pero con la anterior versión no me quede del todo agusto, así que necesito coser otra.


Hot cocoa sweater in lime green and with a collar, it would be my second Hot Cocoa (here). With my previous version I was not enough happy, so I need to sew another.

Picture property of Masustak Eguzkitan


Bestalde hain modan dauden "wrap skirt" bat jostea erabaki dut. Gonaren gainazalak, bata bestearen gainean jarri behar dira mota honetako gonak josterakoan, Megan Nielsenek eta Tilly and the buttonsek beraien bertsioa daukate. Nirea liburu japones batetik ateratako patroi baten bertsio diferente bat da, liburu hau opari bat izan da, baina guzti hau hurrengo batean azalduko dizuet...

Se me ha ocurrido coser una "wrap skirt". Una de esas faldas que para cerrarlas tienes que poner una superficie encima de otra, están muy de moda y Megan Nielsen y Tilly and the buttons tienen las suyas. Mi falda es una versión con algunos cambios de un libro japonés que me han regalado, pero esto os lo contaré otro día...

I´m going to sew a wrap skirt. They are very popular in the blogosphere and Megan Nielsen and Tilly and the buttons, made their own wrap skirt pattern. Mine will be a pattern from a japanese book that was a gift, but I will tell you all the story in other post...

Picture property of Masustak Eguzkitan


Eta azkenik proiektu faraonikoa... zertxobait ezagutzen nauzuenok jakingo duzuen bezala, proiektu bakoitzarekin helmuga hurrutiago eta zailago jartzea gustoko dut, hori dela eta Sewaholicek Robson Coat patroia atera zuenean, nirea izan behar zela pentsatu nuen. Patroia etxera heldu zenean erronka izugarria izango zela konturatu nintzen eta hemen nago proiektua erdizka daukadala eta momentu erdi purdizkoak pasatzen...hasieran komentatu dizuedan bezala, erronkek kolapsatuta naukate, proiektu kopuru izugarria izan baidut mahai ganean eta horrek nire Robson Coat kutuna alde batera uztera eraman nau. Baina Fenixaren antzera bueltan dago eta ekainean zehar amaituko dut, seguru!

Y por último el proyecto faraónico del mes...las que me conocéis un poquito, ya os habréis dado cuenta, que con cada grupo de proyectos de costura nuevos (porque lo mio va por grupos no por unidad...ja, ja, ja), me gusta marcarme un reto un poquito más difícil. Por  eso cuando Sewaholic lanzó el Robson Coat, no lo dude, tenía que ser mio. Llego a casa y lo estudié, entonces me di cuenta de lo difícil del reto y por eso ahora lo tengo a medias encima de mi mesa de costura. He pasado momentos de bajón con este proyecto, como os he dicho al principio, los demás retos me tienen colapsada, las prendas a coser se me multiplican y eso ha hecho que mi querido Robson Coat se haya quedado a un lado. Pero tranquilas porque como un ave Fenix que resucita de sus cenizas, en junio lo termino, seguro! 

And to finish, this month´s huge project ... those who know me a bit, as you may have noticed that with each group of new projects (because I sew several projects on the same time ... ha ha ha), I like to do a little more difficult challenges than previous. So when Sewaholic launched the Robson Coat , no doubt, I had to buy one. When the pattern was at home, I studied it, then I realized how difficult the challenge would be and now I have sewn only half of the project. I have spent times of downturn with this proyect, as I have said before, the other challenges collapsed me, the garments to sew multiply on my sewing table and my dear Robson Coat has been sidelined. But calm, because as a Phoenix bird that rises from its ashes, I finish it in June, for sure!


2013/04/26

Naii sewalong in progress!

Kaixo! Gaurkoan Naiiren sewalongaren aurrerapenak erakutsiko dizkizuet. Naii lan ikaragarria egiten ari da, azalpen ugari eman ditu ehunaren inguruan eta patroia nola neurtu behar den. Patroi beretik bertsio ugari egin ditu eta nik bertsio asimetrikoa egingo dut (behekaldean dagoen argazkian agertzen dena).

¡Hola! Hoy os quiero enseñar mis adelantos en el Sewalong de Naii. Naii esta haciendo un trabajo increible, ha hecho un montón de entradas explicando el comportamiento de la tela elástica y como tenemos que adaptar el tamaño del patrón. Además de un mismo patrón Naii ha hecho diferentes versiones y yo me he decantado por la versión asimétrica (la versión que aparece en la foto de abajo).

Hi there! This post is about my progress in the Naii´s sewalong. Naii is doing an incredible work with this sewalong, she is explaining how to work with jersey knits fabric and how to alter the pattern to fit well. Besides, she has drafted different versions of the pattern and I chose the asimetric top (you can see it in the picture below).


Picture from Naii.

Naiiren patroitik tunika tamainuko pieza ateratzen da baina nik piezak luzatu eta jantzia egingo dut. Aukeratu dudan ehuna jersey elastiko fina da. Gernikan erosi nuen ehuna da. Zer iruditzen zaizue? Niri koloreak asko gustatzen zaizkit eta gainera ehunak jauskera ederra dauka, jantzi honetarako beharrezkoa den ezaugarria.

Desde el patrón de Naii se puede coser una túnica, pero yo voy a alargar las piezas para tener un vestido. Para coser mi vestido voy a utilizar un punto jersey muy finito, así que haré la versión elástica. Esta tela la compre en Gernika, qué os parece? A mi me encanta el color y el dibujo de esta tela, pero aparte me gusta mucho la caida que tiene, esto me va venir genial para el vestido de Naii.

From Naii pattern, you can sew a tunic, but I'm going to lengthen the pieces to have a dress. To sew my dress I will use a very thin jersey knit, so I'll sew the elastic version. I bought this fabric in Gernika, do you like it? I really love the colour and the print, but otherwise I really like how drapes the fabric, it´s perfect for this kind of patterns.


My fabric (picture from Masustak Eguzkitan).


Naiik proba bat egitea gomendatu digu eta nire ehuna hain gustoko dut ez dudala piziatu nahi hori dela eta bertsio sinplea ebaki eta josi dut neurria ondo dagoen jakiteko. Baina proba josi baino lehen...mini-maiderra! Bi mini-maider marraztu nituen, bata kamiseta tamainuarekin eta botoiduna eta bestea jantzia. Jantzia gustatu zitzaidanez jantzia josiko dut.

Naii nos ha recomendado que hagamos una prueba y a mi que me encanta mi tela, así que he pensado que era una buena idea para no piciarla y cortar el tamaño que no es. Para ello he realizado una prueba de la versión simple. Pero antes de ver la prueba... mis mini-maider! Dibujé dos, una con la túnica y versión botonera y otra versión vestido y asimétrica. Como ya sabéis coseré la asimétrica porque a mi mini-maider le sienta fenomenal.
 
Naii recommended us to test our size with a muslin. I thought it was a good idea because I love my fabric and I don´t want to make a big fault with it. For this muslin I cut the more simple version. But before looking at the muslin ... my mini-maider! I drew two, one it´s the tunic with buttons and the other is the asymmetrical dress. As you know the asymmetric is my favourite because my mini-maider looks great on it. 


Picture from Masustak Eguzkitan.

Eta hemen daukazue josi dudan proba edo muselina (nahi duzuen bezela!). Ehun elastikoa erabili dut, benetakoan erabiliko dudan ehuna, askosaz elastikoagoa da baina beno, gutxi gora beherako proba bat egiteko ondo dago. Bularreko pintzak leku egokian daude eta tamaina ona da, hori dela eta, aurrera!

Y aqui tenéis la prueba, muselina o glasilla (madre mia que lio!) que he cosido. La tela que he escogido es mucho más elástica que la de la prueba, pero para una más o menos esta bien. Las pinzas del pecho están donde tienen que estar y el tamaño es el correcto, así que sigo hacia delante!

And this is my muslin. The muslin´s fabric isn´t elastic enough, but more or less is sufficient to test the pattern´s size. Bust darts are in the correct place and I think that this is my size, so I continue forward!


My muslin (picture from Masustak Eguzkitan).


Hurrengo pausua: ehuna ebaki, asko gustatzen zaidan pausua, kar, kar, kar!!!

El siguiente paso: cortar la tela, lo que me encanta vamos, ja, ja, ja!!!

The next step: to cut my fabric, I love this step, ha, ha, ha!!!


2013/03/28

Mini-Maider: March

Iepa! Sarrera hau eta astelehenean egingo dudanarekin batera antolatuta dauzkat, hau da, oporretan nago! Blogan eguneraketak izan arren ni ez naiz hemendik izango, hala ere bueltan zuen blog guztiak bisitatu eta komentatuko ditut, zin dagit!

¡Hola! Esta entrada y la que veréis el lúnes las tengo programadas, y se publicarán automáticamente, estoy de vacaciones! Aunque mi blog siga actualizándose yo no estaré por aqui, pero a la vuelta os visitaré y os dejare comentarios, os lo prometo!

Hello! This entry and the following on monday are scheduled and they publish automatically, I'm on holydays! While my blog is updatingwill not be around, but when I will come back, I will visit your blog and leave you a comment, I promise!


Picture from Masustak Eguzkitan.
 
Aurreko sarreran Naiik esan zidan nire mini-maiderrak ikusi nahi zituela, honen inguruko sarrerak ikusi nahi badituzue (hemen), programatzen ditudan proiektuak aurrera eramaten jarraitzen dudala konturatuko zarete. Oraingoan martxoan eskua artean ditudan proiektuak erakutsiko dizkizuet.

En la anterior entrada Naii me comentó que echaba de menos mis mini-maider, si véis las entradas sobre mis minis (aqui), os daréis cuenta de que los proyectos que me propongo van saliendo. Esta vez os enseño lo que tengo entre manos en marzo.


In my previous post, Naii commented that she missed my mini-maiders, you can see the posts about my mini maiders here, and you will realize that the projects I have proposed, are coming out. This time I show you what is in my sewing table.

Transforming the Burda 03/13 mod.119


 Lehenengo ta behin martxoko Burda Challengea erakutsiko dizuet. Hilabete hontako aldizkarian kapa bat azaltzen da (Burda 03/2013 mod.119), gustokoa nuen arren, zerbaitek ez zidan guztiz konbentzitzen, modeloak zerbait aldrebestua zeukan eta horrek arraroa bilakatzen zuen. Hori dela eta  patroia nire erara aldatzea pentsatu nuen eta emaitza marrazkiaren ebaluatzea (goian dagoen argazkian ikusi daitezke aldaketak).

Gorputza txorixo baten antzera lotzen zuen kordela kendu egin nion. Kaputxaren azkenengo piezatxoa ere fuera! Arrantzeleek eramaten duten ziren itxura ematen zion pieza horrek. Bestalde kapa neurriz kanpokoa zela iruditu zitzaidan, handiegia, hori dela eta neurri txikiena kopiatu nuen 34-36. Behekalde zuzena ez zitzaidan batere gustatzen hori dela eta kurbatu egin nuen. Belkroak itxura kutrea ematen ziola uste dut hori dela eta nireak botoi metalikoak izango ditu askozaz eleganteagoak ;-) Eta azkenik forroa jarriko diot, Euskal Herriko udaberrirako egokiago delakoan nago.

Primero os enseñaré el proyecto elegido para el Burda Challenge de este mes, es una capa. La capa que nos proponían los del Burda me gustaba (Burda 03/2013 mod.119), pero algo chirriaba o no me cuadraba en el modelo...algo hacía que este patrón fuera "raruno" sabéis de que hablo,¿verdad? Así que pensé en cambiar el patrón a mi bola y a ver que pasaba (en la imagen de arriba se puede ver los cambios que fui haciendo).

Lo primero fue, quitar la cuerda esa, que según los del Burda hacia que la capa se ajustara al cuerpo...más que ajustar diría apretar a lo chorizo cantimpalo. Por otro lado le quite la pieza a la capucha...era demasiado! Parecía el mítico petacho de las prendas de los pescadores! Por otro lado, me dio la sensación que era una prenda de tallaje super grande, así que copié el patrón 34-36. El bajo no me molaba en plan recto, así que lo hice curvado. En vede ponerle velcro he optado por botones metálicos, en mi opinión mucho más elegante y fino :-) Y por último me pareció que la loneta sin forro era poco para utilizarla en la primavera de Euskal Herria, así que le voy a poner forro.

 First of all, March Burda Challenge. Burda proposed us a cape (Burda 03/2013 mod.119) that in fact I liked, but something squeaked or not went well in the pattern ... something made ​​this pattern ugly. So I had to modify the pattern, see what happened (in the picture above you can see the changes I was making).

The first was, remove the rope that, according to the Burda  explanations, the rope fits the body ... more than adjust, I have to say that the rope tightened you like a sausage. In addition I removed the piece in the hood ...was too! It seemed a fishermen hoodie with that piece! On the other hand, I thought that it was a super big garment, so I copied the smallest size 34-36. I did not like the hemline, so I curved it. I chose metallic buttons, in my opinion more elegant :-) And finally I am going to sew lining in the cape, because the cotton canvas was not warm enough for the Basque Country´s spring.
 

Now, it is a different cape!
Zer iruditzen zaizue? Ni oso pozik nago!!! Sarrera hau argitaratzen denerako, nire kapa amaitua izango da eta seguenik jantzita eramango dut ;-) ze orain arte josi dudana oso profesionala geratzen hari zait eta oporretara eramango dudala uste dut.

Eta azkenengo mini-maiderra Colette patroi batekin jantzi dut, Colettek argitaratu duen azkenengo patroiarekin: Laurel. Ezagutzen duzue? Nik ikusi nuen momentuan, patroiaz guztiz maitemindu nintzen eta PDF bertsioa erosi nuen, noski erronkan ere parte hartuko dut (hemen). Erabilpen anitzeko patroia da, era askotara makeatu daitekeena, nik hiru bertsio desberdin pentsatuak ditut! Gainera ehun eder bat gordea daukat patroi honen jantziaren bertsioa josteko, baina hori apirilean izango da. Gaurko sarreran, josiko dudan lehenengo bertsioaren mini-maiderra erakutsiko dizuet, gainera era honetara patroiaren neurria testeatzeko balioko dit. Patroiaren laugarren bertsioa egingo dut, alkandora oso erraza kremallera gabe, baina ikutu desberdina izan dezan "ruffles batzuk josiko dizkiot zamaldean eta mahuketan.

¿Qué os parece la capa por ahora? Yo estoy super contenta!!! Para cuando esta entrada esté publicada, seguro que mi capa esta terminada y la tengo puesta ;-) porque lo que he cosido hasta ahora tiene muy buena pinta y tengo pensado llevármela de vacaciones. Estoy muy contenta con el resultado.

Y la última mini-maider de marzo es de un patrón de Colette, o mejor dicho el último: Laurel. ¿Lo habéis visto? Yo no me pude resistir y compré la versión PDF, y claro me voy a presentar al concurso que han organizado(aqui). Me encanta este patrón, es muy versátil, ya tengo en mente unas tres versiones! Una será con una tela preciosa en versión vestido, pero esto será en abril. Os enseño la primera, que es la que he utilizado para testear el patrón y las tallas. Haré la versión blusa, super sencilla sin cremallera ni nada y con unos pequeños "ruffles" en las mangas y el escote.

What do you think about the cape now? I'm super happy! By the time this post is published, sure my coat is finished and I am wearing it ;-) because  I have thought about taking it on holidays. I am very happy with the result.

And the last mini-maider of March is a Colette pattern, or rather the last pattern launched by Colette: Laurel. Have you seen it? I could not resist and bought the PDF version, and of course I'm going to participate in the contest organized (here). I love this pattern, it is very versatile, and I have in mind about three versions! One will be with a gorgeous floral fabric, but this will be in April. I show you the first one, it will be the one used to test the pattern and the sizes. It will be the blouse version, super simple and without zipper, I am going to add tiny ruffles on the sleeves and the neckline.

My first Laurel.

Azkenik apirilean egingo dudan beste sewalong bati buruz hitzegin nahi dizuet, azkenengo hau Naiik antolatu du. Parte hartzera animatzen zaituet, alkondara eder bat josi behar dugu Naiiren laguntzarekin, dagoeneko 200 bat partehartzaile izango gara!

Beno ba musu handi-handi bat guztiontzat eta nire martxoko joste planak gustatu zaizkizuelakoan agurtzen naiz, oporretatik bueltatzen naizenean emaitzak erakutsiko dizkizuet ;-)

Por último deciros que también me he apuntado al sewalong organizado por Naii. Vamos a coser una preciosa tunica diseñada por Naii. Apuntaros vosotras también, aunque igual ya os habéis apuntado, porque creo que somos unas 200 participantes!

Bueno pues os mando un beso muy muy grande a todas y espero que os hayan gustado mis planes de marzo, la semana que viene a la vuelta de vaciones os enseño el resultado ;-) 

Finally I want to encourage you to participate in the sewalong hosted by Naii. We are going to sew a pretty tunic designed by Naii. We are about a 200 of participants!

A big kiss for all of you and I hope you enjoy my new projects, next week when I will come back I will show you the results!


2013/02/24

Tutorial: how to draw a mini-me

Kaixo! Zer moduz asteburua? Hemengoa zuri zuria! Gaur goizean itzartu naizenean etxeetako teilatuak eta gure herriko kaleak zuri zuriak zeuden! Eguraldi eskas honekin etxean eta berotan eman dut ia egun osoa, eta tutorial bat egiteko denbora izan dut.

Aurreko sarreran otsaileko mini-maiderrak aurkeztu nizkizuen eta askori gustatu zitzaizkizuen, baina nola egin daitezkeen galdetzen zenidaten. Nireak lortzeko oso pausu erraz eta arinak egiten ditut eta beharbada zuek ez dituzuela ezagutzen iruditu zaidanez tutorial bat egingo dizuet, zuek ere panpin hauek egin ditzazuen!

Hola! ¿Qué tal el fin de semana? ¡El nuestro esta siendo muy blanco! Hoy cuando me he levantado por la mañana, los tejados y carreteras de mi pueblo estaban cubiertos de nieve! Con este tiempo tan malo he pasado casi todo el domingo en casa, así que he tenido tiempo de sobra para haceros un tutorial. 

En la anterior entrada os enseñe las mini-maider de febrero y a muchas os gustaron (muchas gracias por vuestras amables palabras) y algunas me preguntabais a ver como las hacía. Dibujar este tipo de croquis es bastante sencillo y rápido si se sabe como, y ahora mismo os voy a enseñar como las hago yo para que vosotras tambien practiqueis, ahí va mi truqui!!!

Hello! How about your weekend?Ours is being very white! This morning, when I woke up, my town´s roofs and roads were covered with snow! With this bad weather, I have spent many hours at home, so I had plenty of time to make you a tutorial.

In my previous post, I showed my february´s mini-maider and many of you liked them (thank you very much for your kind words) and some of you asked me how I drawed them. To draw sketches is quite simple and fast if you know how, so I´m going to show you how I do them. Here is my trick!


Egin behar den lehenengo gauza, erropa estu beltzak jaztea da. Horma zuri baten aurrean jartzen zara eta norbaitek argazki bat atera behar dizu. Ez lotsarik izan!

Lo primero que hay que hacer es vestirse con ropa ajustada negra y ponerse delante de una pared blanca. Y claro...ahora alguien te tiene que sacar una foto, fuera las vergüenzas!

The first thing to do, is to dress in black tight clothes and to stand in front of a white wall. And of course ... now someone has to take a picture of you, outside the shame!


Picture from Masustak Eguzkitan.

Argazki hori inprimitu eta lehioan itsatsi behar duzue. Horri horren gainean, beste horri zuri bat jarri behar da eta... voila! Gure argazkia transparentatu egiten da.

Imprimís la foto en cuestión, y la pegáis en una ventana. Encima de la impresión pegáis otro papel...y voila! Nuestra foto se transparenta.

You have to print the picture, and then you have to stick it on the window. You will stick another paper above the print ... and voila! Our picture is transparent.


Picture from Masustak Eguzkitan.

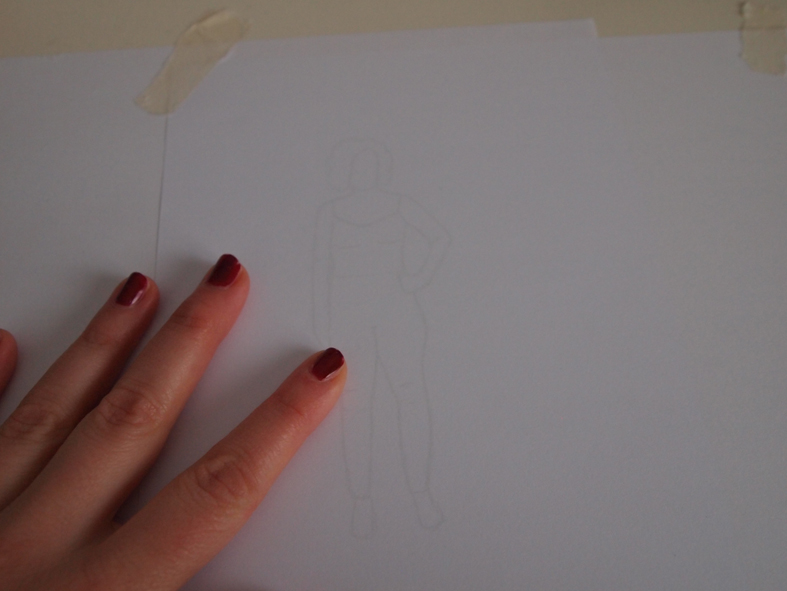
Arkatzarekin gure gorputzaren krokisa egingo dugu.

Entonces cogemos un lápiz y vamos haciendo el contorno de nuestro croquis.

Then we take a pencil and we start making the outline of our sketch.


Picture from Masustak Eguzkitan.


Gure gorputza marraztua dugunean, mahai ganera eraman eta boligrafo batekin marra lodiagoa egiten dugu, trazua nabarmenagoa izan dadin. Bularrak, gerrialdea, ukondoak eta belaunak ondo markatuak egon behar dira, krokis honen gainean erropak marraztuko ditugu eta. Krokisa ondo gordeko dut, mini-maider bat egiten dudan bakoitzean behar izango dudalako modelito berria ikuskatzeko.

Cuando tenemos todo el contorno lo llevamos a nuestra mesa y lo podemos repasar con un boli para que el trazo sea mas visible. Es importante marcar los pechos, la cintura, los codos y rodillas para que luego sepamos hasta donde dibujar las rayas de la ropa. Este croquis de nosotras mismas con ropa ajustada, lo guardaremos bien, porque será el que sacaremos cada vez que necesitemos visualizarnos con algún modelito nuevo.

When we draw all the outline, we leave the paper on the table and we can use a pen to make the line more visible. It´s very important to mark the breasts, the waist, elbows and knees, because then we are going to draw the lines of clothing over our croquis. This sketch of ourselves we will keep in a special place, because we will need it, every time we are going to sew something to visualize the new outfit on our body.

Picture from Masustak Eguzkitan.

 Gainean papera jartzen diogunean perfekto transparentatzen da. Nahi duzuna marraztu dezakezu gainean.

Ahora si le ponemos un papel encima se transparenta y podemos dibujar lo que queramos.

Now if we put a paper on top, the lines are transparent and we can draw whatever we want.

Picture from Masustak Eguzkitan.

Burdako bi modelo hauek aukeratu ditut proba bat egiteko.

He elegido este modelo del Burda de marzo para hacer la prueba.

I have chosen these two Burda patterns to make a test.


Picture from Masustak Eguzkitan.

Marrazkia koloreztatu dezakezue.

Una vez contorneado todo podemos darle color.

When you have finished the lines, you can color it.


Picture from Masustak Eguzkitan.

Eta hemen dago nire mini-maiderra modelito barri batekin? Zer iruditzen zaizue? Erraza ezta? Laister zuen marrazkiak ikustea espero dut!!!! Musu handi bat nire jarraitzaile kutunei, beti baidute nire bloga bisitatu eta komentatzeko denbora!!!!

Y aqui esta mini maider con un modelazo nuevo! ¿Qué os parece? ¿Fácil verdad? Espero ver pronto vuestros croquis!!!! Un besazo para todas vosotras, que siempre tenéis un momentito para pasaros por aqui!!!!

That´s it! My mini-maider is finished. What do you think? It´s easy, isn´t it? I can´t wait to see your mini-me!!!! A big kiss for all my dear ladies, who always have time to leave a comment and visit my blog!!!!

Picture from Masustak Eguzkitan.